DIY Kitchen Island Dining Table Ideas to Modernize Malaysian Kitchens
| Table of Contents |
|---|
(Introduction)
In modern home design, multifunctional DIY kitchen island dining tables are becoming increasingly important. This type of furniture is not just a simple kitchen appliance but a versatile piece that combines cooking, dining, and social functions all in one. It significantly enhances space utilization, making the kitchen not just a place for cooking but also a hub for family gatherings and socializing with friends.
In the Malaysian market, the demand for multifunctional DIY kitchen island dining tables is rapidly growing. This trend is driven by several factors, including the compactness of residential spaces, the rise of the DIY culture, and consumers' pursuit of personalized and practical furniture. With the acceleration of urbanization, small-sized homes are becoming more common, making it essential to efficiently utilize every inch of space.

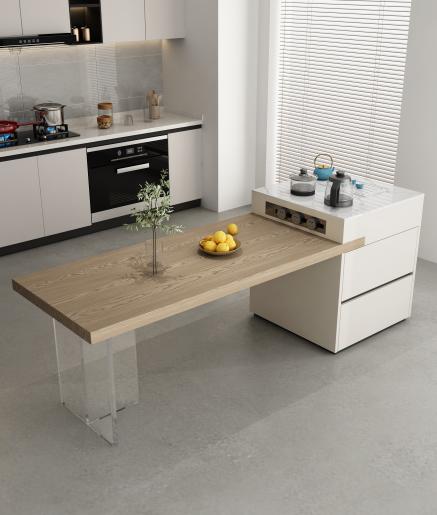
What is a Multifunctional Kitchen Island Dining Table?
The Multifunctionality of Kitchen Island Dining Tables
A multifunctional kitchen island dining table is a piece of furniture that combines cooking, dining, and storage functions. Through clever design, this furniture maximizes kitchen space and increases efficiency. For example, a well-designed kitchen island dining table can serve as a food preparation workspace, a family dining area, and a storage space simultaneously.
Specifically, multifunctional kitchen island dining tables have the following notable features:
- Combination of Cooking and Dining Areas: This design allows users to prepare ingredients and dine in the same space. This not only improves space utilization but also facilitates interaction among family members. For instance, while preparing dinner, family members can dine or chat nearby, enhancing family cohesion.
- Storage Function: Multifunctional kitchen island dining tables are usually designed with ample storage space, such as cabinets, drawers, and open shelves, for storing kitchen utensils, tableware, and ingredients. This helps keep the kitchen tidy and organized.
- Flexibility and Customizability: Depending on different needs and space sizes, multifunctional kitchen island dining tables can be designed and customized in various ways. For example, you can choose to add power outlets for convenient use of kitchen appliances or install movable cutting boards and built-in trash bins under the island for enhanced operational convenience.
How Multifunctional Kitchen Island Dining Tables Can Change Your Lifestyle
- Optimize Space Utilization: By integrating multiple functions, multifunctional kitchen island dining tables allow the kitchen space to be used most efficiently. For small-sized homes, this means achieving more functions within limited space, thereby improving the quality of life.
- Enhance Social Interaction: Traditional kitchens are often places where family members work alone, while the design of multifunctional kitchen island dining tables encourages more family interaction and socializing. Family members can prepare food, dine, and communicate together, not only increasing family cohesion but also making the kitchen a more important social space in the home.
- Increase Convenience: Multifunctional kitchen island dining tables improve kitchen operation convenience by adding storage space and integrating the use of appliances. Users can more efficiently prepare ingredients, cook, and clean, reducing unnecessary movement and time waste.
- Personalization and Aesthetic Appeal: DIY multifunctional kitchen island dining tables allow users to design and customize according to their needs and preferences. This not only ensures that every home has unique and practical kitchen furniture but also enhances the overall aesthetics and personalization of the home decor.
In summary, multifunctional kitchen island dining tables not only integrate cooking, dining, and storage functions but also significantly improve modern family lifestyles by optimizing space utilization, enhancing social interaction, and increasing convenience. The rise of this trend in the Malaysian market reflects consumers' ongoing pursuit of efficient, practical, and aesthetically pleasing furniture.

How to Choose the Right Island Size for Your Kitchen Space?
What is the Appropriate Size for a Kitchen Island?
Choosing the right island size for your kitchen space is a crucial step in creating a functional kitchen. Here are some guidelines on how to measure and select the appropriate size:
- Measure Your Kitchen Space: Start by measuring the overall area of your kitchen, especially the spot where you plan to place the island. Consider the kitchen's length, width, and height to determine the optimal size for the island.
-
Standard Dimensions for Kitchen Islands:
- Height: Typically, the standard height for a kitchen island is 36 inches (approximately 91 cm), which suits most people's usage habits. If you plan to use the island for dining, consider a height of 42 inches (approximately 107 cm) to accommodate bar stools.
- Width: The width should be determined based on the size of the kitchen. A common width ranges from 24 to 36 inches (approximately 61 to 91 cm), providing ample space for cooking and dining.
- Length: The length can be adjusted according to the kitchen's length, but generally, a length between 48 to 72 inches (approximately 122 to 183 cm) is a popular choice.
- Ensure Working and Moving Space: It's essential to leave enough working and moving space around the island. It's recommended to leave at least 36 to 48 inches (approximately 91 to 122 cm) of space on each side of the island to avoid feeling cramped during use.
How Much Space is Needed Between the Kitchen Island and the Dining Table?
When designing the layout of the kitchen island and dining table, leaving sufficient space is key to ensuring the kitchen's functionality and comfort:
- Distance Between Island and Dining Table: It's recommended to leave at least 36 to 48 inches (approximately 91 to 122 cm) of space between the island and the dining table. This allows for easy movement between the two and ensures that multiple people can work or dine in the kitchen simultaneously without feeling crowded.
- Walkway Width: If the kitchen design includes major walkways, the walkway width should be at least 48 inches (approximately 122 cm) to facilitate movement within the kitchen. This is especially important if family members frequently move around in the kitchen or if you often have guests.
- Consider Other Kitchen Zones: When planning the space, also consider other functional zones in the kitchen, such as the locations of the refrigerator, oven, and dishwasher. Ensure there is enough space around these appliances for easy access and use.
By following these steps, you can choose and design a multifunctional island dining table that fits your kitchen space. This not only enhances the functionality of your kitchen but also provides a convenient and comfortable dining and social space for your family.

How to Design a Multifunctional DIY Kitchen Island?
What are the Basic Steps for Designing a DIY Kitchen Island?
Designing a multifunctional DIY kitchen island involves following these basic steps:
-
Planning and Design:
- Measure Your Kitchen Space: Accurately measure the overall kitchen space, especially the spot where you plan to place the island. Determine the island's dimensions, considering its height, width, and length to ensure it fits into the kitchen layout.
- Draw a Design Plan: Based on the measurements, draw a design plan for the island. The design plan should include detailed dimensions and layout, such as storage space, dining area, and cooking area arrangements.
-
Choosing Materials:
- Wood: Common woods like pine and oak are ideal for a DIY kitchen island. These woods are durable and easy to work with.
- Countertop Materials: Options include marble, quartz, or wooden countertops. Quartz and marble are durable and easy to clean, while wooden countertops provide a warm aesthetic.
- Prefabricated Cabinets: Using ready-made cabinets can simplify the construction process and provide additional storage space.
-
Preparing Tools:
- Basic Tools: Essential tools for DIY kitchen island construction include a circular saw, miter saw, nail gun, screwdriver, drill, and sandpaper. These tools are crucial for measuring, cutting, and assembling the island.
- Safety Equipment: Ensure the use of safety goggles and gloves to avoid injuries during the construction process.
-
Construction and Assembly:
- Measure and Cut: Precisely measure and cut the required wood and countertop materials according to the design plan. Accurate cutting is essential for smooth assembly.
- Assemble the Base Frame: Build the base frame of the island using screws and nails to secure the structure firmly. You can use prefabricated cabinets as the foundation and reinforce the base structure.
- Install Cabinets and Storage Spaces: Install the prefabricated cabinets onto the base frame to provide ample storage space. Ensure the cabinets are securely fastened and stable.
- Add Finishing Details: Install trim, baseboards, and decorative panels to enhance the island's appearance. Paint the island according to your preference to add color and style.
-
Install the Countertop:
- Secure the Countertop: Attach the pre-cut countertop to the cabinets, ensuring it is level and securely fixed. Use appropriate adhesives and fasteners to prevent movement.
What Materials are Best for a DIY Kitchen Island?
Choosing the right materials is crucial for the success of a DIY kitchen island. Here are some budget-friendly and suitable material recommendations:
- Pine: Pine wood is soft, easy to cut and work with, and relatively inexpensive, making it ideal for frames and cabinet materials.
- Oak: Oak is hard and durable with high compressive strength, suitable for making countertops and structural components.
- Bamboo: Bamboo is a renewable resource, affordable, and environmentally friendly, ideal for countertops and decorative parts.
- Plywood: Plywood is low-cost, easy to cut and handle, and can be used for making cabinets and base frames.
- PVC Toe Kick Supports: This material is inexpensive, durable, and easy to install, used to support the base of the island.
- Concrete: Concrete countertops are durable and have an industrial look, a cost-effective and sturdy option.
- Porcelain Slab Countertops: A new material with high strength and wear resistance, relatively affordable, suitable for countertops.
What Basic Tools are Needed for a DIY Kitchen Island?
To successfully complete a DIY kitchen island project, here is a list of essential tools:
- Circular Saw and Miter Saw: Used for cutting wood and countertop materials to precise dimensions.
- Nail Gun and Screwdriver: Used for fastening the base frame and cabinets, ensuring structural stability.
- Drill: Used for drilling holes and installing screws, convenient and quick.
- Sandpaper and Sanding Tools: Used for smoothing surfaces, ensuring a flawless finish.
- Safety Goggles and Gloves: Ensure the protection of eyes and hands during the construction process to avoid injuries.
Cost-Control Techniques
- Choose Materials Wisely: Opt for economical and durable materials like pine, plywood, and bamboo. Avoid using expensive materials like solid wood and natural stone.
- Utilize Existing Resources: Use prefabricated cabinets and countertops to save time and cost. You can repurpose parts from old furniture.
- Complete the Project in Stages: Break down the DIY project into phases, completing one part at a time to reduce the financial burden of one-time investment.
- Buy Second-Hand Tools: If you don’t have the necessary tools, consider buying second-hand tools or borrowing from friends to reduce the cost of tool purchases.
- Participate in Group Buying or Sales Events: Look out for group buying and sales events when purchasing materials and tools to effectively lower purchasing costs.
By following these steps, using the right tools, choosing appropriate materials, and controlling costs, you can design and create a beautiful and practical multifunctional DIY kitchen island. This not only enhances the functionality of your kitchen but also provides a comfortable dining and social space for your family.

Why is Cost Budgeting the Key to the Success of a DIY Project?
What is the Approximate Cost of a DIY Kitchen Island Project?
In a DIY kitchen island project, cost budgeting is one of the key factors for success. Generally, depending on the materials and size chosen, the estimated cost of a DIY kitchen island ranges between $200 and $500. This range depends on several factors:
- Material Selection: Different materials vary greatly in price. Using cost-effective materials like pine, plywood, and PVC supports can effectively control costs. High-end materials like marble and quartz are durable but come with a higher price tag.
- Size and Complexity: The size and design complexity of the island also affect the overall cost. Larger and more complex designs require more materials and labor, naturally increasing project costs.
- Tools and Equipment: DIY projects usually require some basic tools and equipment. If you already own these tools, the cost will be relatively lower. If new tools need to be purchased, initial investment will increase, but these tools can be reused in future projects.
How to Control Costs in a DIY Kitchen Island Project?
Controlling costs is a crucial step to ensuring the success of a DIY project. Here are some tips and methods to save costs:
-
Choose Economical Materials:
- Pine and Plywood: These materials are inexpensive and easy to work with, making them suitable for frames and cabinet materials.
- PVC Toe Kick Supports: Inexpensive and durable, suitable for supporting the structure.
- Porcelain Slab Countertops: A new material with high strength and wear resistance, relatively affordable and suitable for countertops.
-
Utilize Existing Resources:
- Repurpose Old Furniture: Reuse parts from old furniture, such as using old cabinets for storage space in the island.
- Use Ready-Made Components: Using pre-made cabinets and countertops can save a lot of time and cost.
-
Complete the Project Gradually:
- Implement in Phases: Break the project into phases, completing one part at a time, which can reduce the financial burden of a one-time investment. This approach allows you to control the budget while adjusting and optimizing the design during the process.
-
Buy Second-Hand Tools and Materials:
- Second-Hand Market: Purchasing tools and materials from the second-hand market can significantly reduce costs. You can also borrow tools from friends to cut expenses.
-
Participate in Group Buying or Discount Events:
- Deals and Discounts: Pay attention to group buying and discount events when purchasing materials and tools. Many hardware stores and online platforms regularly offer discounts and promotions.
-
Plan and Design Reasonably:
- Keep Designs Simple and Practical: During the design process, maintain a simple and practical design style, avoiding unnecessary complex structures and decorations. This can save materials and construction time.
Why is Cost Budgeting Key?
- Ensuring Project Feasibility: A reasonable cost budget ensures that the DIY project is economically feasible. Projects without budget constraints may lead to excessive spending on materials and tools, ultimately resulting in incomplete or poor-quality projects.
- Avoiding Overspending: Detailed budget planning helps avoid impulsive spending when purchasing materials and tools, ensuring that every penny is well spent. By setting a budget in advance, you can control the total project cost and avoid interruptions due to additional expenses.
- Improving Efficiency: With a clear budget, each stage of the project will be more efficient. From material selection to tool purchase to actual construction, every step can be carried out according to plan, reducing time and money waste.
- Quality Assurance: Choosing high-quality materials and tools within the budget ensures that the final result of the DIY project is not only aesthetically pleasing but also durable. Avoiding the use of cheap but low-quality materials prevents repeated construction and additional repair costs.
- Planning and Control: A detailed budget helps plan each aspect of the project, ensuring all steps are completed within the budget. This planning and control prevent mid-project plan changes, maintaining the project's consistency and completeness.
By following these methods, you can effectively control costs in a DIY kitchen island project while ensuring the quality and functionality of the final product. This not only aids in budget management but also makes the project more feasible and successful.

How to Ensure the Safety and Stability of a DIY Kitchen Island?
What Safety Precautions Should be Taken During the DIY Process?
Safety is one of the most important considerations in the DIY kitchen island process. Here are some safety precautions to take:
-
Wear Appropriate Protective Gear:
- Safety Goggles: Protect your eyes from flying wood chips and dust.
- Gloves: Protect your hands from cuts and abrasions.
- Face Mask: Wear a mask during cutting and sanding to prevent inhalation of harmful dust.
-
Tool Safety:
- Tool Inspection: Check tools before use to ensure they are in good condition and that cords are not damaged.
- Proper Operation: Operate tools according to the manual to avoid misuse and injury.
- Keep Work Area Clean: Ensure the work area is free of debris to avoid tripping or accidentally knocking over tools.
-
Material Handling:
- Safe Cutting: Use a stable workbench and clamps to secure materials when cutting to prevent movement.
- Prevent Slippage: Use non-slip mats or clamps to secure parts during assembly to prevent accidental movement.
How to Ensure the Structural Stability of the Island?
Ensuring the structural stability of a DIY kitchen island is crucial for project success. Here are some tips for ensuring stability:
-
Choose Suitable Fasteners:
- Screws and Bolts: Use high-quality screws and bolts to secure major components firmly.
- Wood Glue: Use wood glue when connecting wood parts to add strength and prevent loosening.
-
Check Each Connection Point Repeatedly:
- Inspect Fasteners: Repeatedly check each connection point during assembly to ensure all fasteners are tight.
- Ensure Level and Alignment: Use a level and measuring tools to ensure each part is installed level and aligned to prevent tilting or instability.
-
Reinforce the Base Structure:
- Use Support Beams: Add support beams to the base frame to enhance overall stability.
- Install Additional Feet and Support Rods: Add extra feet and support rods to the base of the island to increase stability and prevent wobbling.
-
Choose Suitable Materials:
- Sturdy Wood: Select strong and durable wood, such as oak and pine, to ensure structural strength.
- Durable Countertop Materials: Choose durable countertop materials, such as quartz and porcelain slabs, to provide additional stability and longevity.
-
Regular Maintenance and Inspection:
- Routine Checks: Regularly check the island's connection points and support components to ensure there are no loose or damaged parts.
- Timely Repairs: Repair any issues promptly to prevent small problems from becoming major hazards.
-
Weight Distribution:
- Even Weight Distribution: Ensure the weight on the island is distributed evenly to prevent tilting and instability.
- Use Support Elements: Place support elements under heavy items to help distribute the weight and prevent structural deformation.
-
Secure to Floor or Wall:
- Additional Fastening: For larger or frequently used islands, consider securing them to the floor or wall for added stability. Use appropriate fasteners and brackets to ensure a solid connection.
-
Professional Advice:
- Consult Professionals: Seek advice from professionals during the DIY process, especially when dealing with complex structures or installing heavy countertops, to ensure each step meets safety standards.
By paying attention to the above safety precautions and structural stability tips, you can ensure that your DIY kitchen island is not only beautiful and functional but also safe and reliable. This will provide your family with a safe and comfortable cooking and dining environment.

Conclusion
How Does a Multifunctional DIY Kitchen Island Dining Table Enhance the Practicality and Aesthetics of Modern Homes?
A multifunctional DIY kitchen island dining table plays a crucial role in modern home design. Its design not only enhances the functionality of the kitchen but also significantly improves the aesthetics of the home. Here are some key points:
- Optimizing Space Utilization: The multifunctional island combines cooking, dining, and storage functions into one, efficiently utilizing limited kitchen space. This design is particularly beneficial in small homes, offering more functionality within a confined area.
- Enhancing Family Interaction: The island dining table serves as a central point where family members can gather to prepare food, dine, and interact. This design not only makes cooking more enjoyable but also increases family interaction and cohesion.
- Balancing Aesthetics and Practicality: A DIY kitchen island dining table can be designed and customized according to personal preferences, allowing for different materials and color combinations that match individual styles while meeting practical needs. Whether your style is modern minimalist or rustic farmhouse, DIY can bring it to life.
- Increasing Storage Space: Islands typically include multiple storage cabinets and drawers, providing extra storage space to keep the kitchen neat and organized. This is especially important for families with a lot of kitchen supplies and utensils.
Closing Remarks
A multifunctional DIY kitchen island dining table is more than just a project; it is an enhancement of lifestyle. We encourage all readers to actively participate and share their DIY projects and experiences. By sharing your creativity and results, you not only showcase your personal style but also provide valuable inspiration and assistance to others.
Additionally, you can follow us on our social media platform, DPhome.my. Together, let’s create more beautiful and practical kitchen spaces and enjoy the fun and sense of accomplishment that DIY brings.

FAQ
Is it cheaper to buy or build a kitchen island?
Building a DIY kitchen island dining table is generally cheaper than buying a pre-made one. The cost depends on materials and tools, but DIY projects can often be done for $200 to $500, while pre-made islands can cost significantly more. Building allows you to customize and save on labor costs.
How to make a cheap kitchen island?
To make a cheap DIY kitchen island dining table:
- Materials: Use affordable materials like plywood, pine wood, or reclaimed wood.
- Reuse and Recycle: Repurpose old cabinets or furniture.
- Simple Design: Keep the design straightforward to minimize material costs and complexity.
- Basic Tools: Use essential tools like a saw, drill, and sander.
Is it hard to build your own kitchen island?
Building your own kitchen island is manageable with basic woodworking skills and tools. By following detailed plans and starting with a simple design, most DIY enthusiasts can successfully complete the project. It's important to plan carefully and take accurate measurements.
Can I design my own kitchen island?
Yes, you can design your own DIY kitchen island dining table. Start by measuring your space and determining your needs for storage, seating, and workspace. Use design software or sketches to plan your island, and choose materials that fit your budget and style.
-
Posted in
island table


